
- Filter it through a clean cloth, paper towel, or coffee filter OR allow it to settle.
- Draw off the clear water.
- Bring the clear water to a rolling boil for one minute (at elevations above 6,500 feet, boil for three minutes).
- Let the boiled water cool.
- Store the boiled water in clean sanitized containers with tight covers.
- Bring the clear water to a rolling boil for one minute (at elevations above 6,500 feet, boil for three minutes).
- Let the boiled water cool.
- Store the boiled water in clean sanitized containers with tight covers.
- Filter it through a clean cloth, paper towel, or coffee filter OR allow it to settle.
- Draw off the clear water.
- To use bleach, add 1/8 teaspoon (or 8 drops; about 0.625 milliliters) of unscented liquid household chlorine (5-6%) bleach for each gallon of clear water (or 2 drops of bleach for each liter or each quart of water),
- Stir the mixture well.
- Let it stand for 30 minutes or longer before you use it.
- Store the disinfected water in clean sanitized containers with tight covers.
- To use iodine, follow the manufacturer’s instructions.

Other Water Tank Suppliers
Class A Customs Water Tanks Information
Fresh / Drinking Water Safe
BPA FREE – Class A Customs does not carry this chemical nor uses it in the manufacturing process
NSF Certified Materials Tank & fittings made from DOW NSF International NSF/ANSI Std 61 approved Medium Density Polyethylene (MDPE) Resin
UV-8 stabilization Complies with: U.S. FDA 21 CFR 177.1520 (c)3.1a Canadian HPFB No Objection Underwriters Laboratories Inc. EU, 10/2011 NSF International NSF/ANSI Std 61 (sec 4 & 5)


You must verify requirements with health department where inspection will be made before purchasing.
Forward the documents provided to your local health department before purchasing to be sure these tanks will pass your local inspection, this is your responsibility.
Codes vary by local health departments, not states, we are not aware of the codes.
Fresh Water Tank
Gray Water Tank
Size (Gallons / Measurements - Health Departments require the Gray tank to be larger than the Fresh)
Fittings (Size / Placement / Materials)
Drainage (Fittings / Placement)
Tank Placement (Inside / Outside)
Gray Water Tank Calculation
Multiply (fresh tank size) x 1.15 (1 . 15%) = Tank needed
30 x 1.15 (15%) = 34.50
30 x 1.50 (50%) = 45
I have only so much room how many gallons can I get in that space?
We do not recommend sizes or verbally give measurements please look at the Water Tank List located at the top of each webpage to see all tanks Class A Customs currently manufactures.
How are the water tanks measured?
Please be sure to look at the photos provided with each item as measurements and fitting placements will be included. Note the measurement of the tanks do not include the fittings, this will add extra length to the tank.
~ Fittings ~
Due to increased sales we are no longer
able to offer custom fittings on water tanks.
Where are the fittings located in the tank? What kind of fitting are in the tank?
Our Stock Tanks come with 4 fittings all located on the same side of the tank. Be sure to look at the tank photos and description to clarify fittings.
Can I cut a hole in the tank and glue another fitting in?
No, fitting are spun welded into the tank, friction between the fitting and the tank causes both to melt and permanently seal, no additional glues or sealants are used to install the fittings.
The residue left by putting the fittings in place is part of the material the tanks and fittings are made from and may spider crack or flake off over time, this in no way harms the tank or causes any usage issues.

Is that a fitting or a clean-out on the side?
Each tank will come with at least one vent hole made during the manufacturing process, a permanently mounted patch is placed over this hole this is not a fitting and does not unscrew.

~ Plumbing ~
Have a certified technician install all parts to prevent product damage and personal injury.
All water tanks we carry must be vented, they are not pressurized tanks.
You must allow air to move in and out when filling and emptying the tank. Do NOT fill the tank directly from a pressurized line (garden hose), this is not a safe option and will explode the tank. We recommend using a fill dish to allow for gravity feeding of the tank, please review our plumbing example for more information.

What fittings will I need?
This will depend on how you are setting-up your tank and will vary by application. Please view our Plumbing Category for information on loose fittings we carry.
At this time Class A Customs only installs the following fittings into our Fresh / Gray tanks
.5" NPT Female
1.5" NPT Female
1.25" Outer Diameter x 2" Long Smooth Pipe (Boss Fitting)
It is recommended to use plastic male fittings with plastic female fittings to avoid damaging the threads, metal thread fittings can crush the plastic threads.


1.25" spout fitting can be used for water inlet or drain


What is a fill dish?
The fill dish is located on the outside of your unit so that you can easily add water to your tank without the need of opening a compartment or climbing under your unit. You can find the fill dishes in the Plumbing Category.
For adding water to the Water Tank you need a Gravity Fill Dish, the hose rests in the port it does not screw onto the port this allows you to place a garden hose into the Gravity Fill Dish port without making a sealed connection so the supply is not pressurized.
For using water directly from a garden hose you need a City Fill Dish, the hose makes a sealed connection and the water supply is pressurized, you can not hook this to your water tank and you do not need to go through your water pump.
We carry Gravity Fill Dishes, City Fill Dishes and Combo Fill Dishes that have both gravity and city, the benefit of having both is you can have a water tank of fresh water but if you go to a location that supplies pressurized water (campground - fair - etc.) you do not need to use your water tank supply of water you can simply use the water provided. Be sure to look at the provided example plumbing diagram for more reference.
But what if I only turn the garden hose on half way?
Customers who do this still explode the tank because you can not determine the pressure of the water flowing only the amount of water.

I am not using a fill dish how can I fill the tank?
We recommend you place a fitting in the tank that will allow you to rest the hose in to fill, not make a sealed connection, you can then cap this when not in use. You can use an elbow fitting to allow you the fill the tank to capacity, use an elbow with a screen secured over it to vent the tank.
Can I put a cap on and off of the tank?
If you are needing to use a fitting by adding and removing a cap, remember tank must be vented allowing air in/out during use, we recommend you place a fitting in the tank and a cap on that fitting in order to prevent damage to the tank fitting.

~ Monitor Panels & Water Tank Probes ~
Water Tank optional Installed Water Tank Probes, Loose probes are available for customer installation.
For Step-by-Step Photos visit our Blog Post Water Tank Monitor Probes
Monitor Tank Installation Help


~ Installing & Bracing ~
The tank looks like the side is bowed, is it safe?
Due to the manufacturing process all the tanks especially the larger in size will have a bowing to the walls, when the tank is filled the tank will expand out removing the inward bow, we recommend laying all tanks on a level surface (this can be angled) and bracing the tanks. For larger tanks it is recommended to brace all side walls with plywood or metal, we do not recommend using ratchet straps on the tanks alone as this is a large amount of weight on a thin strip and may cause cutting into the tank.
Tank Average Thickness
All tanks will vary on thickness but on average they are .219 or 7/32" thick.
Can I stack the water tanks on top of each other?
No, do not place anything on the tanks, if you need to stack the tanks you will need a weight bearing shelf between them.
Do I need to brace the water tank?
It is recommended to brace all side walls with plywood or metal, we do not recommend using ratchet straps on the tanks alone as this is a large amount of weight on a thin strip and may cause cutting into the tank.

Can I set the tank up on end?
Yes, you can place the tank on any side, you will need to brace the tank and run a food grade pipe or hose down inside to reach the bottom of the tank. For easier use fittings can be moved and additional fittings added. You will need to fill-out the tank form to show the placement and once confirmed your order will be processed the next business day.
Can I mount the tank under the trailer?


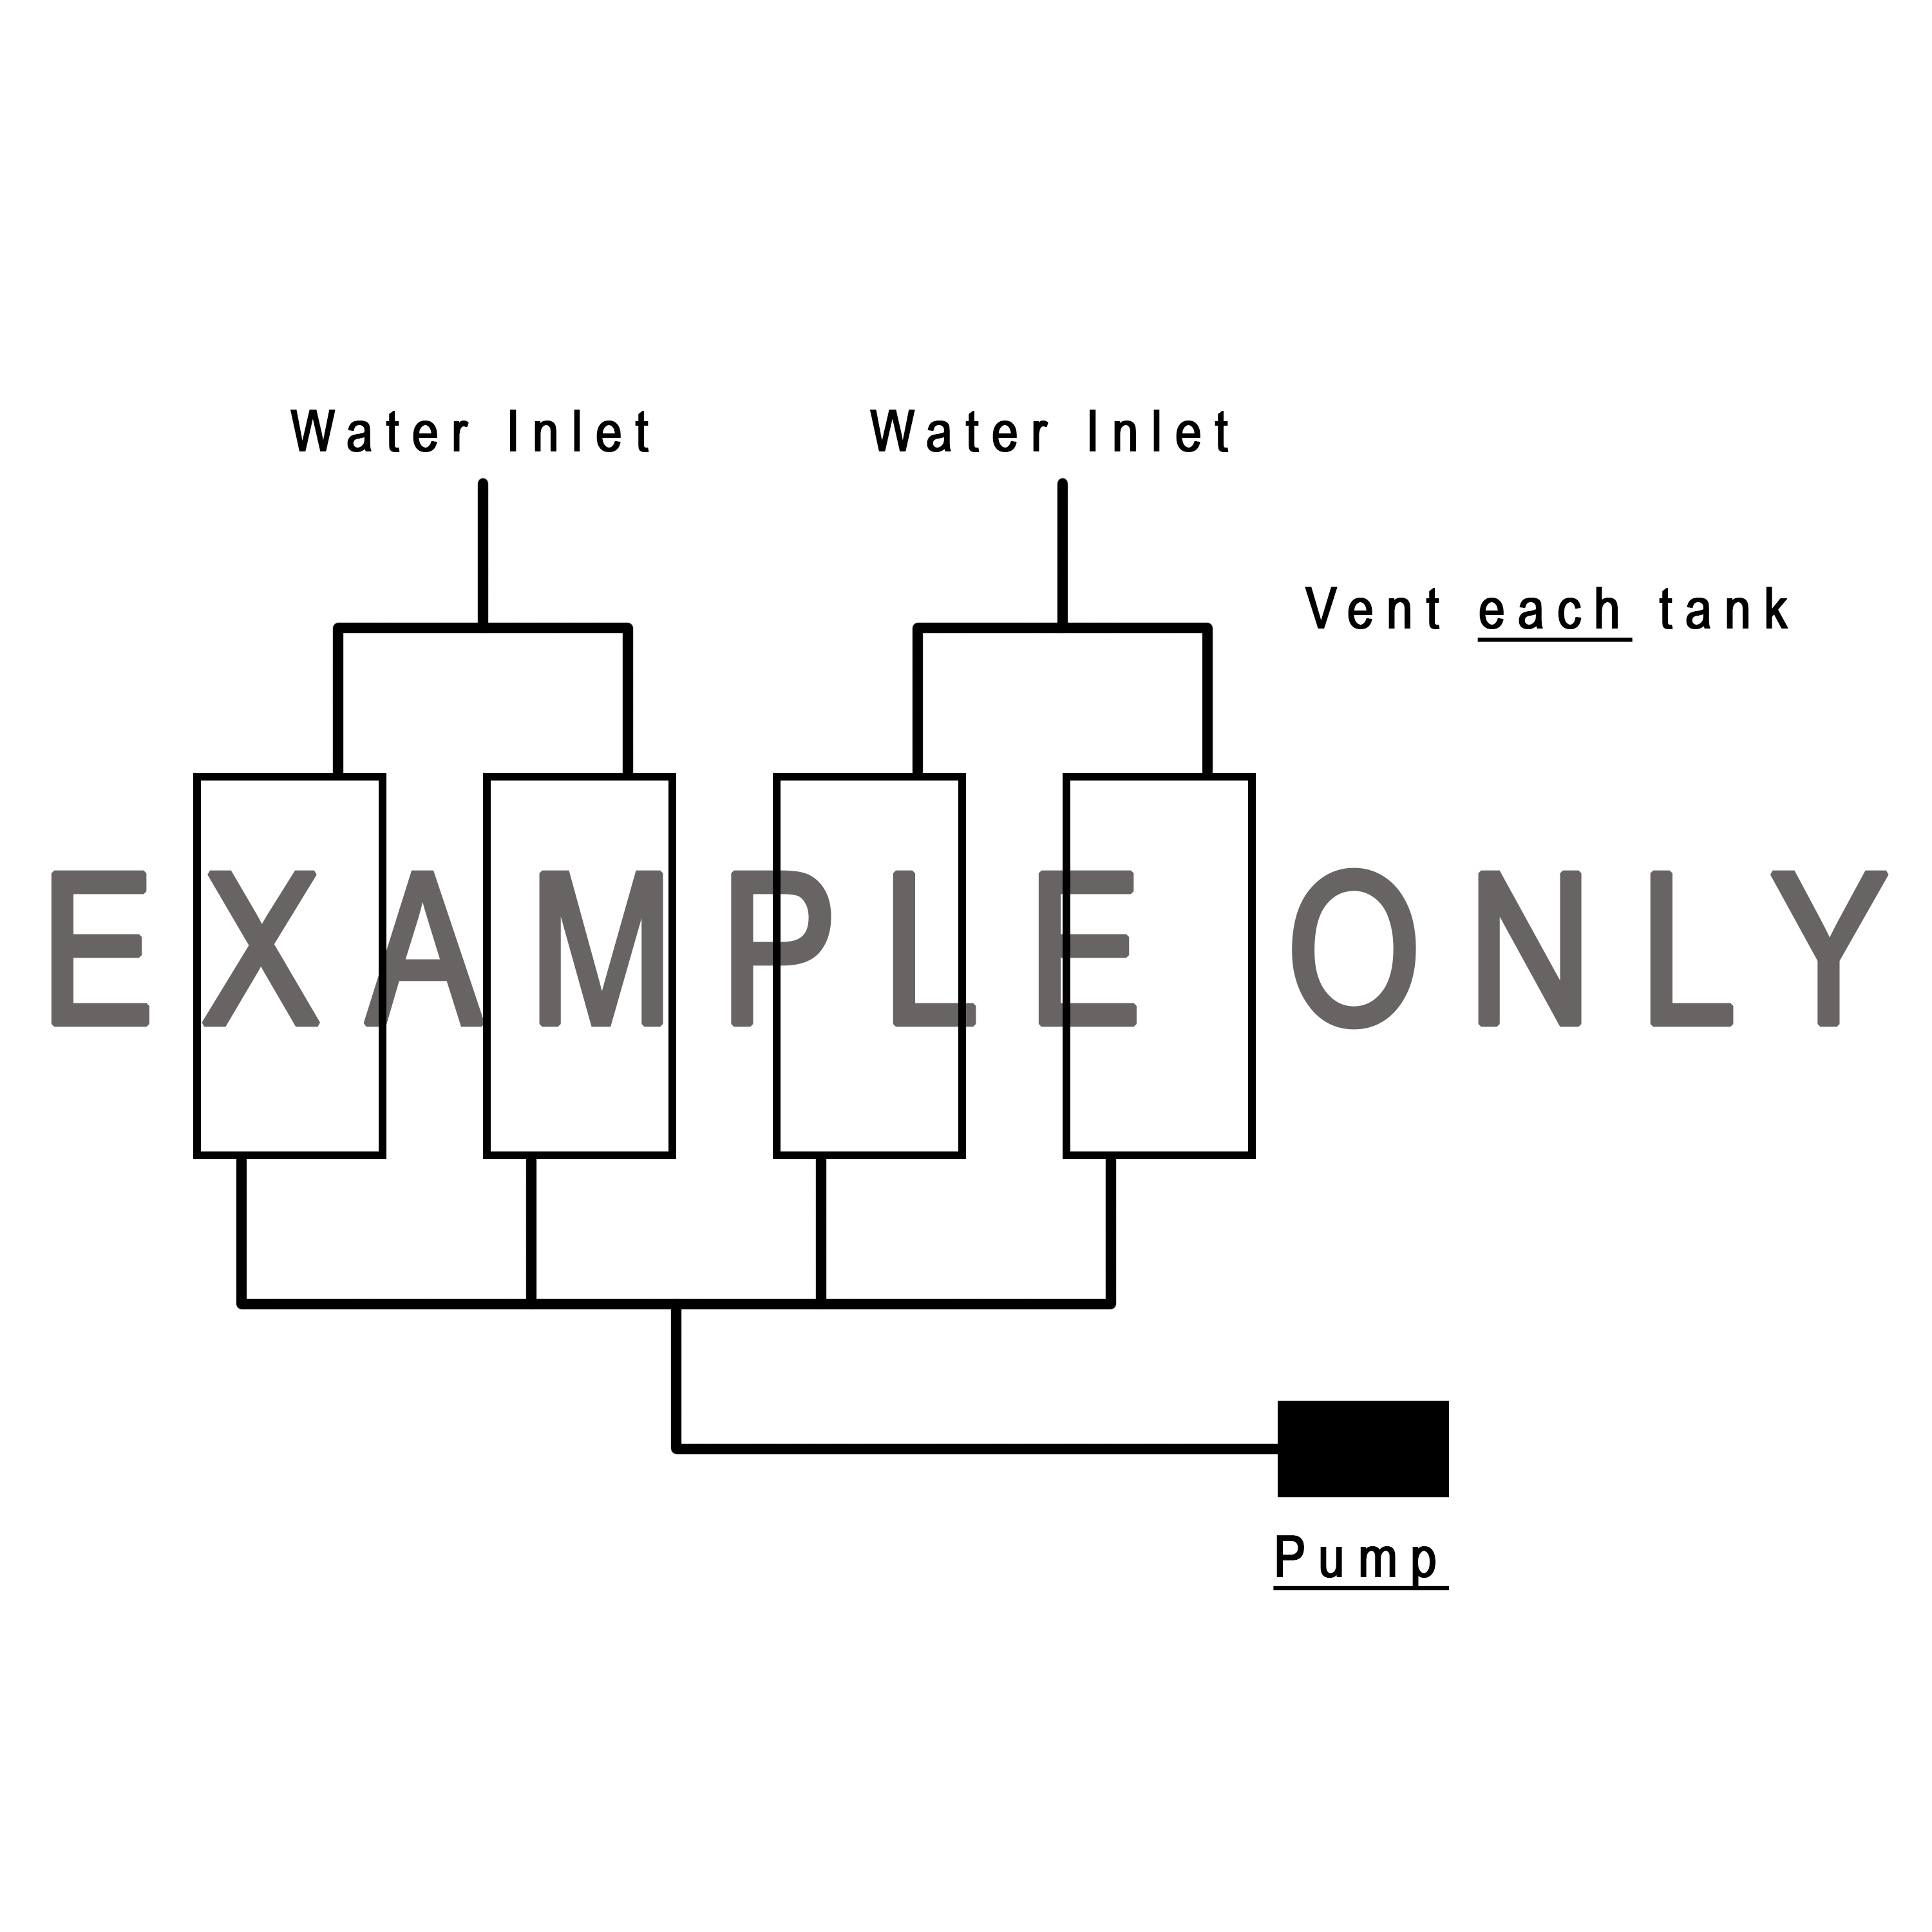
Can I hook more than one tank together?
Yes, you will need to check with a certified plumber to see what fittings and set-up will work best for your unit, remember to vent each tank.
This is an example only, installation will vary depending on your unit.
Sanitize each tank prior to use to remove any debris from the manufacturing process. Tanks are made in a warehouse so maybe dusty or scuffed, this does not effect the use or safety of the tank, wipe with a damp cloth to remove surface dust or scuffs.

Make Water Safe - Click to Download
1. Prepare a chlorine solution using one gallon of water and a ¼ cup of household bleach (5% sodium hypochlorite solution) ** DO NOT USE FRESH SCENT OR ANY SCENT ENHANCED BLEACH **
Never mix bleach with ammonia or other cleaners.
Open windows and doors to get fresh air when you use bleach.
With tank empty, pour chlorine solution into tank. Use one gallon of solution for each 15 gallons of tank capacity.
2. Complete filling of tank with fresh water.
3. Allow to stand for three (3) hours
4. Drain and flush with potable fresh water.
Any residual chlorine odor will dissipate naturally.
Class A Customs 30 Day Return Policy
Customer will need to return all merchandise in new, unused condition and packing materials if available.
To return item customer will need to pay return shipping. Packages refused or return to sender will not be delivered back and no credit/refund will be issued.
Returns c/o Class A Customs
1130 County Road 6 West
Elkhart, IN 46514
Phone: 574-206-0101
Include a copy of original purchase receipt 20% Restock fee will be charged for all orders.
Return Process
This time period includes the transit time for us to receive your return from the shipper (5 to 10 business days), the time it takes us to process your return once we receive it (3 to 5 business days), and the time it takes to return the correct item. We'll notify you via e-mail of your refund once we've received and processed the returned item.